Sunday 29 September 2019

Stem and stringers

In today's news: I roughed out the bevels on the stem and slotted in a deadwood, made out of the same pine board I used for gluing up the stem. I carved out the slot with a hand chisel, about 1 cm deep. There will be a few oak treenails going through it. In addition the lower chine logs will flank it, so it should be plenty strong.


Then everything got put together. Some last minute checks and adjustments of the frame alignment and the stringers can be dry-fitted to check how it all looks like. Looks fantastic, all curvatures look great, the stringers touch every frame without play. On the right the last of the chine logs clamped up on the scarf joint:


Next step: affix the longitudinals to the frames. That should go fast(-er) since there seem to be no more devilish details left to do for now.

Friday 27 September 2019

The boat. In 3D.

With most all individual little pieces ready, meaning the frames, all (but one) of the longitudinals scarfed up and ready, only the stem remains. I actually found some pine (!) floor boards at the local DIY store. I'll have pine wood in the boat after all, just what the design calls for :). The boards are 2cm thick so i'll need to glue up 2 to get to the specified 3cm thickness. After planing, cleaning and gluing it is curing now all clamped up. Here's the before and after view:


Now on to something larger, lining up the frame supports on the strongback. I use a laser level to get everything straight and true. That, and the help of my better half:


And that's me among the empty supports:


From there is it easy (though time consuming) to cross-brace everything for stiffness:


Line up the frames in the correct places (center and water lines aligned  using the laser level, what a fantastic device:) ), trim the excess bracing and you end up with a hull shaped space just waiting to be finished.


All frames are screwed in place (through the plywood of the bulkheads, somewhere inconspicuous, I don't want to have holes in the frames or other visible places) with the exception of the B frame (the one with a 60deg tilt):


For now it sits on a movable carriage waiting to be positioned after the installation of top (or, actually bottom) bracing - the lines must be flowing nicely. Leaving one frame floating leaves me with the possibility to correct some mistakes I may have made when constructing the frames. I'll be eyeballing the curvature of the braces in the worst case if it looks off. But so far so good.


Hasta la pasta, kids. Tot de volgende keer.

Sunday 22 September 2019

Half a boat. Sort of.

While the stringers are drying, I managed to clean up the tent to make room for the boat ;)
Also, with the help of a friend I managed to erect half the hull worth of frames. Temporarily, but it still looks kinda nice. See for yourselves:


Chine logs and stringers

With the frames complete, it is time for the longitudinal members, the stringers and the chine logs. First some raw sawn timber needs to be had from the local sawmill:

Then the raw timber needs to be selected, cleaned up and cut in neat long strips of proper sizes. I need 3 kinds: stringers ~3.0x2.4 mm, chine logs: 5.0x2.4mm and the chine logs that bind the hull to the deck: 7.0x2.4mm. All of that needs to be knot free and straight(-ish) grained.


 I did not manage to find a single nice board that would be long enough (~5.5m) so I will need to join them. A 10:1 ratio scarf-joint will do here. I started cutting the first scarfs by hand using my power plane. It worked, sort of, but required a lot of doing since the power tools are too big and heavy for the small diameters of the parts, so I had to fine tune the faces with a hand plane and chisel. A pleasure on it's own, but I could do better.


A simple scarfing jig came into existence. With the circle saw I have I can cut up to ~5cm depth (that already includes the ~1cm of the guide plate thickness) which is plenty for most scarfs I need. The 7cm ones I cut partially with the jig, then finished off with a pull saw and a hand plane.


It got a bit messy again for a second in the workshop:


I'll be installing in the stringers first, so I glued them up first (a matter of room, don't have it to glue everything in one go :) ). Since they are small and thin, I've set up everything together and will glue/clamp the lot in a happy little bundle:


The usual gluing strategy was used: pre-wet the mating surfaces with unthickened epoxy, then goop up some slightly thickened one, clamp (not too hard) and wait. Een kind kan de was doen.
cheers!

Thursday 19 September 2019

Frames. Done.

All the frames were assembled already before the summer vacation and here is the obligatory picture as proof:


I decided to waterproof them at this stage since in an assembled hull there will be hard to reach places and I wanted to make sure the wood is properly treated to withstand rot, especially in the closed and semi-closed areas (under the cockpit etc.). The work included making proper fillets in those areas and sealing the wood with epoxy primer and un-thickened epoxy. More on this later, for now a picture of finished and treated frames:

Frames C,D and E aka the rest of them


For the cabin frames which are unsupported by bulkheads I chose to go oversize and used over-dimensioned timber. That is 6cm width instead of the 5-point-something. Since I use a lighter wood species it gives me about the same weight per frame as specified in the design. Should be OK.

The frames got bunk supports built right in, will make it easier to keep the bunks and everything aligned and level after the hull is assembled.


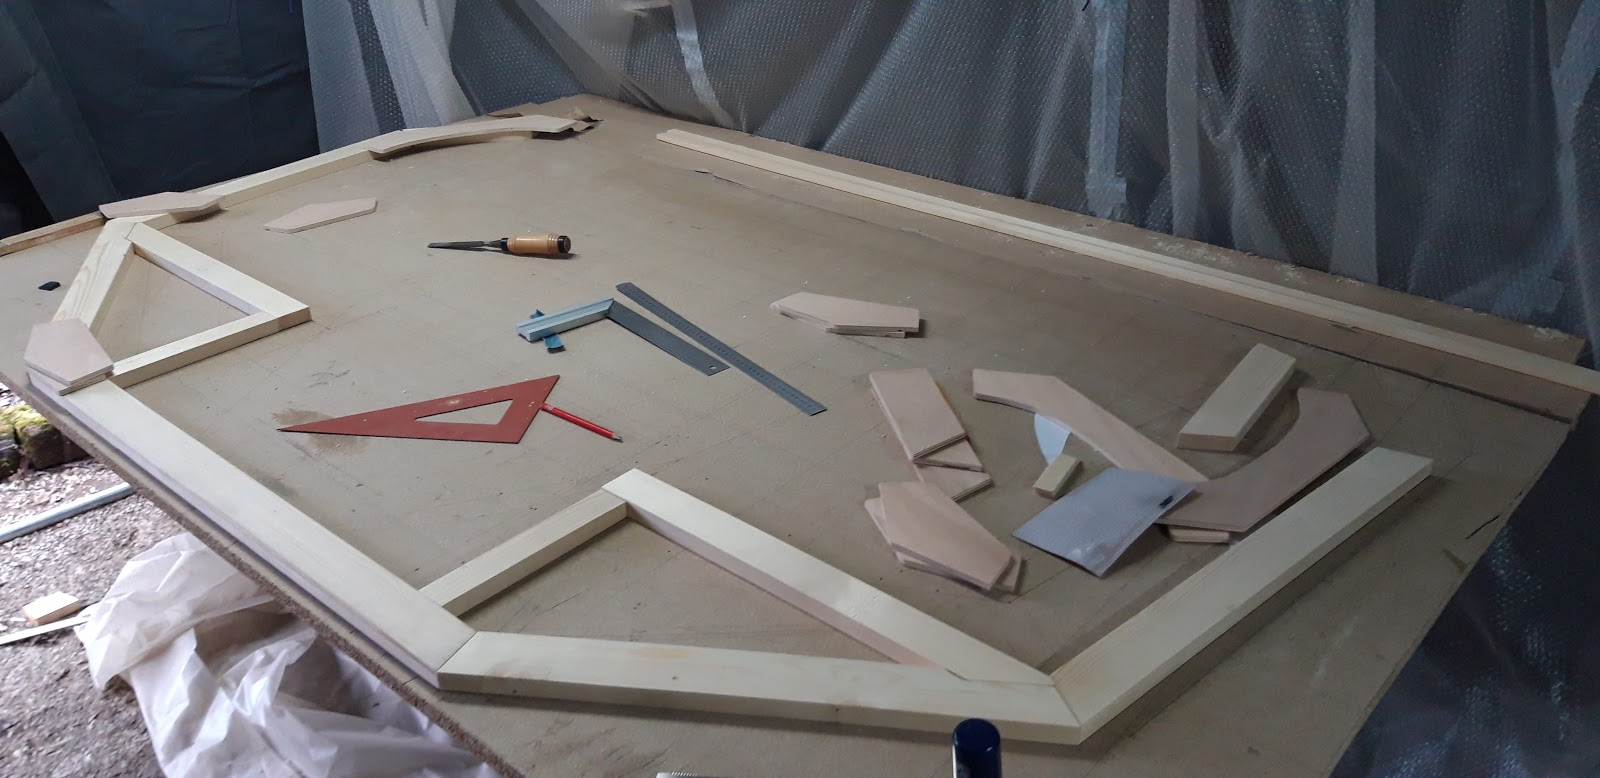
The hull forward of frame D starts to have a curvature under the water line, the frames need to reflect that. Since I did not have a wider plank I glued up some wide enough to support the curvature:


Also here a support for the bunks gets built in, and a small bulkhead to stiffen up the hull. Parts of the bulkhead might go away later on to allow for easy access to stowage.


All ready and curing on the floor:


Frame E has an even larger curvature, the drawing seems to suggest something like this: a sagitta of ~4cm (unless I read the drawing wrong). We'll see how the plywood will bend around that, but for now is is what is is.


Also here, some glue up is needed:


Bunk support and a brace for either a wet locker bottom or just internal stowage. The important part is that the space in between is free so that the v-berth has some leg room all the way forward to the stem. 


Following the recommendations of many (including proper literature) the glue-ups are (mostly) done using the most time consuming and labour intensive method I can imagine:
First, pre-wet the surfaces with un-thickened epoxy to allow for some penetration and saturation. Working with a brush is tough with resin as thick as the one I'm using, so I use a putty knife to spread the goop in a thin layer:


Same on the side of the plywood:


After the first layer tacks up, put some thickened epoxy on and glue away:


... and the final result:


Here the screws used to provide clamping pressure while curing the joints are already replaced by glued in oak trennels. Since these joints (frame-to-gusset and frame-to-bulkhead) will be loaded mostly in the shear direction a larger and stiffer fastener will do as well or better than just a 4mm screw in soft wood. I will make a separate post on the issue of peg vs. screw.

The tent is back

Finally the workshop stands again. After a lot of busywork and other projects I finally managed (with some help) to prep a place for the ten...