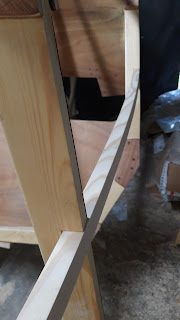
Cutting slots for the stringers, located in the middle of the futtocks, is kinda easy. After placing the stringers in the correct location I cut alongside the beam to get a proper angle. Also I marked the depth on the saw blade. Easy enough.
An oscillating multitool came in handy for gouging out the bottom of the slot. I eyeballed the approximate angle.
Easy, right? NOT. I rushed it again, apparently, and some of the slots came out loose. Not a big deal, in the end I shimmed them and filled the remaining voids with thickened epoxy. Should be good enough, but some of the loose slots will be visible inside the cabin. Ah well, that's life:
I fastened the glue up with temporary fasteners (regular steel stax screws with a shank, stainless is too weak if you want to be able to remove the screw for whatever reason after the resin cures, I've had my share of twisted off heads, as described in one of the previous posts). Does not look very nice, but it does not have to. After removing the stax I'll either drive in a permanent screw and/or glue in a trennel.
The sheer clamp (the chine log at the deck joint): some slots came out perfect, some of them, well, were a tad too large, resulting in a 5mm gap in one place. The joint with goop oozing out (below) is the one i mean. I may decide to cover them all up with larger fillets thickened (coloured) with wood dust to make them match the darker gussets. Or just leave them as they are as a reminder: Measure twice, cut once. Not the other way around...
The stem situation turned out better than expected, and based on my experience so far I had pretty low expectations. Due to the heavily bent longitudinals pulling from all sides, each with a slightly different force the stem did move from it's intended location. Luckily it only moved on the deck side and only by about 3mm. At the waterline the shift is zero. I could have let it be, 3mm is nothing compared to the dimensions of the boat, but I compensated nonetheless by removing 2mm of material from the starboard side of the stem just so that the forestay chainplate does not look off centre when everything is ready.
Below some more pictures of how it turned out:
Next step: bevels and plating!


No comments:
Post a Comment