Monday, 11 October 2021

The tent is back

Finally the workshop stands again. After a lot of busywork and other projects I finally managed (with some help) to prep a place for the tent and actually put it up. Took all of 2 afternoons of work. The tent looks really small in it's new setting :) I hope to be able to start doing some work on Piglet soon.


ciao.

Tuesday, 21 September 2021

How to move boat and workshop from France to Poland

 Well, in fact I have no idea how to do this in general. In my case it went like this:


It took around 28 hours of driving in total, split over 2 days. Ever since I have been a bit preoccupied trying to make this new place habitable and I have not started working on the boat yet. I do plan to though, before the winter is here. It means some updates should start appearing soon.

until then.

Finishing the deck and the cockpit

After the hull fiasco I turned the hull over and started on closing up the top side. The cockpit plating went on covered in 3 layers of epoxy in places that will be hard to reach (the for now closed-off lazarette). Other than that nothing special to report here, standard procedure was followed: pre-wet, glue and screw with temporary fasteners, fill the screw holes with epoxy and screw in final stainless fasteners.


Same thing for the foredeck:


The main deck, or the cabin top is made of two plates joined on a butt block running amidships.


In the end a hatch will be mounted, probably in the opposite direction to what is in the picture below - to reduce the probability of a wave delivering all of it's content inside the cabin.


All that rested was glassing the newly build deck. Alas, I had no time for that so I decided to waterproof the entire top side with epoxy and some varnish. I just gooped it on knowing that I will have to sand it off anyway before actually putting on a reinforcing layer of glass at some point after the move.

I did turn out looking kinda good, but not good enough for me to want to keep the wood visible. It is going to be painted white eventually.


tot de volgende keer

How not to glass the hull...

...lest ye be forced to do much of the work again. After much sanding.

Ok. Let's start. By the time I reached this stage the temperatures went up to SCORCHING. it must have been over 40C in the tent, even in the late afternoon. But since I was running out of time I had to finish the hull in order to flip it and waterproof the deck for transport to the new location (a trip of almost 2000km).

 The orange peel effect seemed not too bad, easy to sand out and the biaxial fabric makes it easy not to bite into the fibers - once you start seeing the white lines of the stitching you stop. The orange peel is caused by two things I presume: the unwillingness of the peel ply to yield to the curvature of the hull and probably some carelessness of mine while laying it.


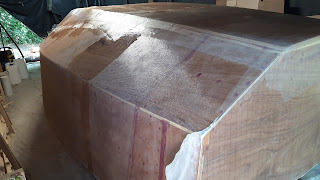
The rest of the process, as noted above, was painful: the heat meant doing everything really fast as even the slow curing resin left not much more than 5-10 minutes of working time. Fast means sloppy. Especially in such a furnace. In retrospect it would have been better to opt for a different glassing scheme that required smaller pieces of cloth, but well, once I started the hard route I could not just stop as I would have wasted a lot of glass. The end result does not look terrible in the pictures below but most if what is laid will have to be sanded smooth to the point of being almost completely gone in places and some new glass will have to be laid.
The bow turned out great, but as I moved aft the results kept getting worse and worse.


All in all I don not recommend working in very hot conditions. And what I screwed up I can fix, it is just some additional work. I do have plenty of time now, so it will be aok.

cheers,

Sunday, 13 June 2021

Sides glassed

 The sides are glassed, 12m2 of glass (2 strips of 5x1.26m) took 6kg of resin. That includes the extra for peel ply, whatever soaked into the wood and whatever I wasted. Took about 2-3 hours per side for 2 people to do. But it did come out nicely. I used thin West System foam rollers (used up 3 of them), a fin roller and some squeegees for application.


After doing one side I noticed something funky: an orange peel like texture in some places, not related to the nylon stitching of the fabric which also leaves some texture. A mystery, maybe something in the plywood substrate, maybe some fin roller artefact... All to be taken care of during fairing. Whenever that will be.


And here both sides done:


Tomorrow the bottom, the transom and the extra piece in the middle to add a little bit more reinforcement to the keel/shroud attachment points. Probably not needed, but I will sleep better given the fact that I am erring on the lower end of the allowed plywood density - but then also the additional weight of such a reinforcement will not be a problem...
 

tot morgen.

Saturday, 12 June 2021

Glass goes on longitudinally

 After a quick fit the biaxial fabric seems to drape quite well over the hull shape along the (almost) entire length of it:

not quite so in the back:

I'll do that part together with the transom.

So, the plan is: Today I'll do both sides and the rest (bottom and transom) tomorrow. Though the magic of peel ply there will not be any complications with laminating on top of already cured laminate. That way I can easily position the bottom strips (there will be 2 of them) and tie the transom in with the rest without worries about resin going off before I'm done laying up peel ply. Also: the chines will get their foreseen reinforcement. The bottom chine will have 3 layers (900g/m2) and the bow section will be even 4 layers just by virtue of the glass strip geometry. I will not even have to cut anything:) The turn of the bilge will be at 300 - which should be fine as it needs 600 when using woven roving. I will add one more layer in the center section where the forces are largest between the chainplates and the keel.

All in all, this is how happy I am:

More pictures tomorrow.

Hull ready for glassing, trailer

It took me 2 days to prepare the hull for glassing, plus some fairing compound and some sanding. The chines are rounded over and made as smooth as they will get - using a long board aka a torture board ;)


I'll start later in the afternoon when the temperature in the workshop drops to 20 degrees or so. I still haven't decided on a layup schedule, we will see how that goes. I will for sure have at least 600g on the bottom, the rest 300 mostly, except the bow which needs to be a bit stronger, especially on and below the water line and around the chainplate attachment points - but that can also be reinforced later.

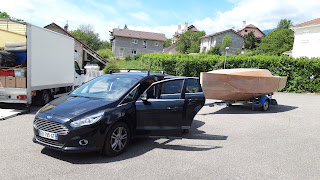
Also: I got a brand new 10 year old boat trailer - 700kg allowed load, which is plenty for this boat. It is made for motorboats - the rollers are in a straight line and are expecting to support a straight piece of skeg or a false keel. I don't have one so I'll have to figure out how to best do this. Funny thing is: this one was very hard to find - no new ones are produced at the moment (maybe in september) and aluminium prices are apparently so high that nobody is selling theirs... So as can be seen here I did find one, but I had to take my son for a roadtrip to pick it up. 600km away. In Cannes. A fun trip it was. We even got to jump in the Med for an hour, but that is a different story.


In two weeks we will be already travelling, so I think I'll skip fairing and painting the hull until after the move. I will fair the bottom under the waterlin, I don't want to have to keep flipping the boat. I do hope I will manage to close the deck and cocpit - a piece of tarp is less reliable in transit:)

The tent is back

Finally the workshop stands again. After a lot of busywork and other projects I finally managed (with some help) to prep a place for the ten...